What is Trompe L'Oeil?
Trompe L'Oeil, which literally translates from French as "deceive the eye," is a technique that dates back centuries, originally used by Renaissance painters like Andrea Pozzo, who mastered the art of making flat surfaces appear as if they’re full of depth and life. Today, it’s more than just a fancy way to trick your brain; it’s a playful decorating style that creates optical illusions in homes and buildings. And while this style may not exactly have you questioning reality, it can definitely make your walls seem more interesting than that off-white hue you were considering.
The Basics of Trompe L'Oeil
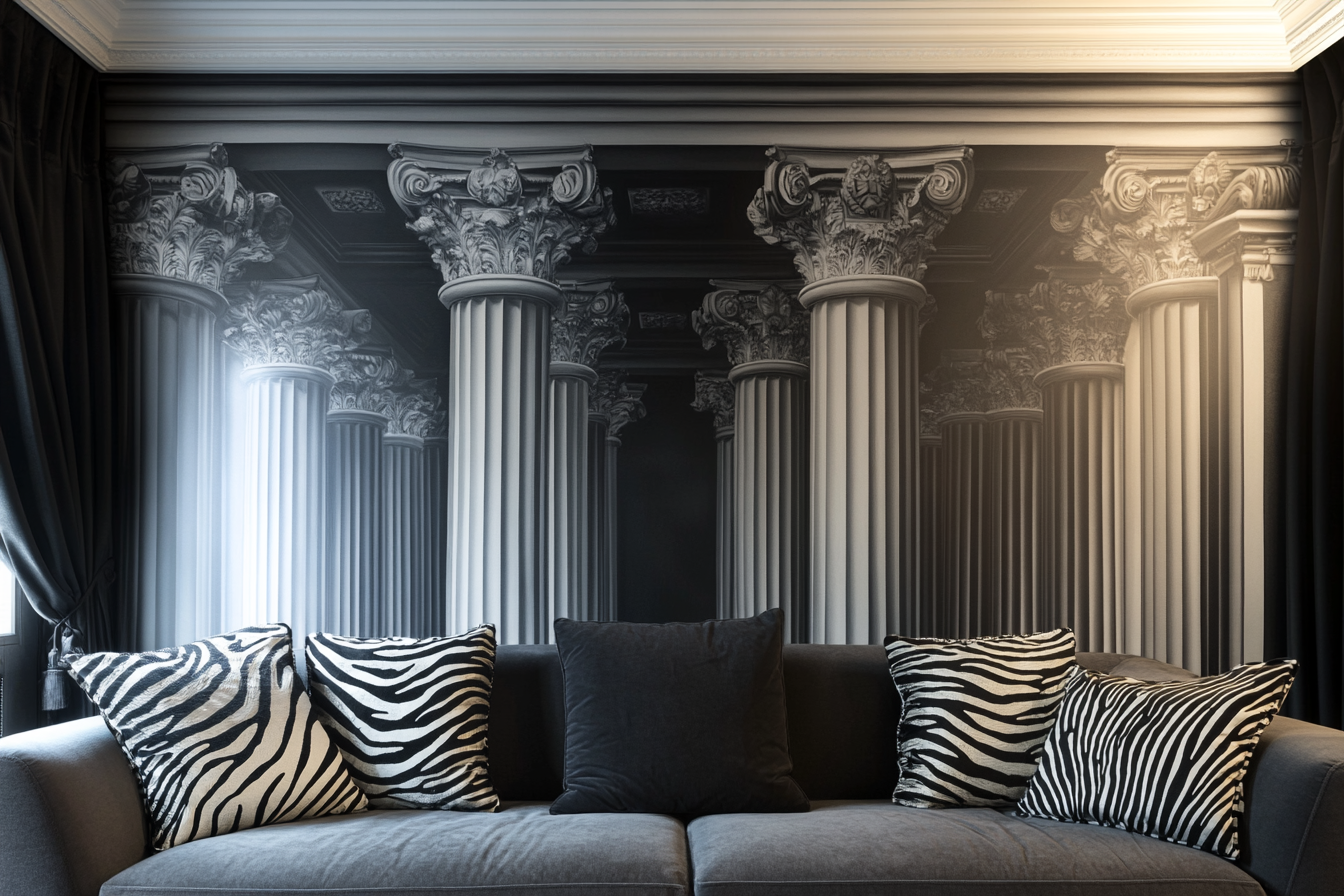
At its core, Trompe L'Oeil is all about painting something so realistic it appears three-dimensional. Imagine walking into a room and being convinced that a marble column extends across the ceiling when, in fact, it's just expertly painted. The goal is not only to mimic objects and scenes but to create a sense of depth and volume, fooling the viewer into thinking what they’re seeing is real.
To master Trompe L'Oeil, the trick is in the details. The shading, the light, the perspective - all must align perfectly. One slight misstep and instead of being an impressive optical illusion, you end up with a weird-looking, somewhat unsettling smear of paint that could make people question your taste in art. But when done right, it’s nothing short of magic.
Famous Examples of Trompe L'Oeil
One of the most famous historical examples of Trompe L'Oeil is the ceiling of the Church of Sant'Ignazio in Rome, painted by Andrea Pozzo. It’s a masterpiece of illusion, where the ceiling seems to open up to a grand view of heaven. In reality, the ceiling is flat, but thanks to Pozzo’s skill, it’s hard to tell. It’s like one big optical prank that’s been fooling the masses for over 300 years.
How to Use Trompe L'Oeil in Your Home
Now, before you start slapping faux columns and Venetian landscapes on every available surface, a few pointers. Trompe L'Oeil works best when it’s used sparingly - unless you’re living in a palace or museum, in which case, go all out. For the rest of us mere mortals, consider focusing on one area in the room. A feature wall, a back wall behind a sofa, a ceiling, or even just a strategically placed “window” on a plain wall can have a huge impact.
Here’s a guide for painting these stunning Grecian columns:
1. Preparation and Materials
Before starting the project, gathering the right materials and prepping the wall is crucial for achieving the best result.
Materials:
Acrylic paints (or oil-based paints, depending on your preference): Light and dark tones for shadow and highlight effects.
Paintbrushes: A variety of brushes (flat, round, and angled brushes) of different sizes. A fan brush can help blend soft shadows.
Sandpaper: 150 to 180 grit sandpaper for a finer finish.
Pencil & ruler: For measuring and sketching the columns onto the wall.
Tape measure & long block of wood or trim: To draw long straight lines.
Painter’s tape: To outline shapes and prevent any paint from straying.
Paint rollers: For base coats.
Artist’s chalk or charcoal: For light sketching and marking placements.
Varnish or glaze: For adding a glossy finish once done.
Wall Preparation:
Clean and sand the Wall: Remove any dust or dirt and lightly sand drywall for a smooth surface to paint on.
Prime the Wall: If your wall is unpainted or dark, use a white primer to ensure your paint colors show up correctly.
Base Coat: Paint the entire wall with a neutral, light color like beige or soft grey to act as the background for your columns.
2. Sketching the Column Design
Before you start painting, plan the placement and size of the columns. Grecian columns are usually positioned on either side of the wall or can extend across a section for a larger, more dramatic effect.
Steps for Sketching:
Measure the Wall: Use a tape measure to mark out where the columns will go. You’ll need to establish the width and height of each column.
Draw Vertical Guidelines: Lightly sketch two parallel lines (representing the edges of the columns) using a pencil or chalk. These will help you keep the columns straight.
Mark the Top and Bottom: Draw a faint line for the top and bottom of each column. Typically, Grecian columns are proportional, so they should start around floor level and reach the ceiling or slightly lower. Use a piece of straight trim or 2x4 as a guide.
Outline Column Details: If your columns are traditional Greco-Roman, they should have distinct fluted details (vertical grooves). Add these markings now as guides.
3. Base Coating and Column Color
To make your columns appear realistic, you need to choose the correct shades and blend them smoothly. The base colors you choose will largely depend on the effect you’re aiming for (whether you want a marble look, stone, or a painted finish).
Step-by-Step Column Color Application:
Base Color: Choose a base color that matches the column’s material (marble, sandstone, or wood). For marble columns, a soft light grey or off-white will work best. Apply the base color across the column area, using a brush or roller, and allow it to dry completely.
Create Gradient Effects: For a more lifelike appearance, add depth and variation to the column surface. Use a slightly darker color along the edges of the column, and a lighter color near the center. This gradient effect mimics the way light would naturally interact with the columns.
Dark Color: Use a dark grey, charcoal, or even a deep brown to create shadows where the column curves or where light wouldn't hit directly.
Light Color: Add lighter tones (off-white, light beige) along the raised areas or the middle of the column.
Trick for Depth: Use a dry brush technique for shadowing. Dip a small amount of paint on your brush, then wipe off excess before gently brushing along the edges to build up the shadow without overpowering the base color.
4. Adding the Fluting (Vertical Grooves)
Grecian columns often feature fluted grooves running vertically down their surface. These grooves can add realism to your painted columns and help define their structure.
Steps to Create Fluting:
Draw Out the Flutes: Using a pencil or chalk, draw evenly spaced vertical lines along the column.
Flute Color: Choose a slightly darker color for the grooves, which will contrast with the column’s main surface. For example, a darker grey or a light brown can create realistic shading.
Paint the Grooves: Using a small round or angled brush, paint within the pencil or chalk lines. Start with a slightly darker color and gradually build up layers to create subtle depth in the grooves.
Blend: Use a damp sponge or brush to blend the shadowing inside the grooves, ensuring the edges aren’t too harsh and the grooves appear seamlessly integrated into the column.
5. Detailing for Realism
To really trick the eye, you'll need to add fine details that enhance the illusion of depth.
Shading and Highlights:
Shadows: Use a soft blending technique to add shadows along the base of the column, beneath the fluting, and around the edges where the column meets the wall. This is key for making the column appear three-dimensional.
Highlights: Add light touches of white or a pale color at the top of the column and along the raised areas to mimic light reflection. Use a dry brush technique to soften these highlights and create a natural, diffused effect.
Texture: For added realism, you can create subtle texture by using a sponge or an old brush. Lightly dab on some light beige or grey colors to simulate the rough, stone-like texture of a column’s surface.
Column Capitals and Bases (Optional): If you wish to paint the top (capital) or bottom (base) of the columns, you can use detailed designs like the classic Corinthian or Ionic capitals, or simple decorative bases. These can be painted with fine brushes using golds, whites, or metallic paints to give the columns a classical touch.
6. Adding Final Touches
Once the basic painting is done, take a step back and assess how realistic the columns appear. Some areas may need more blending, highlighting, or shadowing. Here are a few finishing techniques:
Use a Glaze or Varnish: Once all layers of paint are dry, seal your artwork with a satin or glossy varnish for a shiny finish. This can give the columns a more polished, stone-like look.
Smooth Transitions: Gently use a soft brush to blend harsh lines where shadows meet the column surface, ensuring that the transition is smooth and natural.
7. Optional Tricks and Hacks
Perspective Trickery: If you want to create the illusion that the columns recede into the distance, use slightly smaller columns as you move along the wall. This mimics the forced perspective often used in classical architecture.
Use Multiple Shades: Don’t rely on just one or two colors for shading. Try using variations of grey, brown, and white to create rich, lifelike depth.
Stencil for Quick Results: If freehand painting isn’t your style, use column stencils or wall decals to get the shapes down quickly, and then add your custom shading and detailing.
If you're not feeling quite so artistic yourself
Don’t fret - Trompe L'Oeil can also be achieved through wall decals, wallpapers, and murals. Companies have made it easier than ever to transform your space with these illusions without needing to know how to wield a paintbrush.
In the end, Trompe L'Oeil is about more than just fooling the eye - it’s about bringing a bit of whimsy and intrigue into your everyday surroundings. And let’s be honest, who doesn’t want their home to be a little more magical?
If you're looking to add some pizzazz to your Trompe L'Oeil masterpiece, look no further than our collection of luxury throw pillows and luxury faux fur blankets & throws. Toss in a few exotic zebra print pillows for good measure, and your space instantly goes from "just painted walls" to "wildly sophisticated sanctuary."
Thanks for reading!


